
Antique hardwood floors are more than just a part of your home’s structure; they are pieces of history that exude charm and character. Refinishing these vintage floors can be a delicate process, as you want to breathe new life into them without losing the very essence that makes them special. In this guide, we will take you through the intricate process of refinishing antique hardwood floors while preserving their historical charm.
Understanding the Value of Antique Hardwood Floors
Before diving into the refinishing process, it’s essential to recognize the value of antique hardwood floors. These floors tell a story, bearing witness to the passage of time and the footsteps of generations. They often feature unique wood species, patterns, and craftsmanship that are difficult to replicate in modern flooring materials.
Preserving these floors isn’t just about aesthetics; it’s about respecting the history and craftsmanship that went into creating them. When done correctly, refinishing antique hardwood floors can enhance their beauty and longevity while maintaining their historical significance.
Assessing the Condition of Your Antique Hardwood Floors
The first step in refinishing antique hardwood floors is to assess their current condition. This evaluation will help you determine the extent of the work needed and the best approach to take. Here’s how to go about it:
- Inspect for Damage:
Look for signs of wear and tear, including scratches, gouges, stains, and water damage.
Check for loose or squeaky boards that may need to be secured. - Determine Finish Type:
Identify the type of finish on your floors, as this will affect the refinishing process. Antique floors may have a wax, shellac, varnish, or polyurethane finish. - Measure Wood Thickness:
Measure the thickness of the wood. Over time, sanding can thin the wood, so it’s crucial to ensure there’s enough material left for refinishing. - Identify Any Historical Features:
Take note of any unique design elements, inlays, or patterns that you want to preserve during the refinishing process. - Test for Lead Paint:
If your floors were finished before 1978, there’s a possibility of lead-based paint. Test for lead and follow proper safety precautions if present.
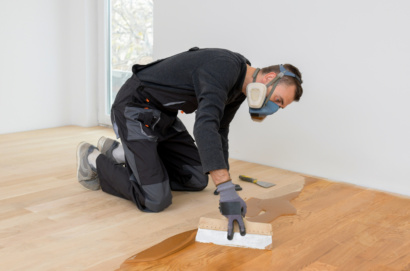
The Refinishing Process
Once you’ve assessed your antique hardwood floors, you can begin the refinishing process. Keep in mind that this process requires patience and attention to detail to maintain the charm and character of the wood.
- Clear the Space:
Remove all furniture and fixtures from the room to create a clean workspace. - Prepare for Dust:
Sanding will produce a significant amount of dust, so seal off adjacent rooms and use dust containment measures like plastic sheeting and a good-quality dust mask. - Sanding:
Use a drum sander with progressively finer grits of sandpaper to remove the old finish and any surface imperfections.
Pay extra attention to high-traffic areas and spots with visible damage, but be cautious not to over-sand, as this can weaken the wood.
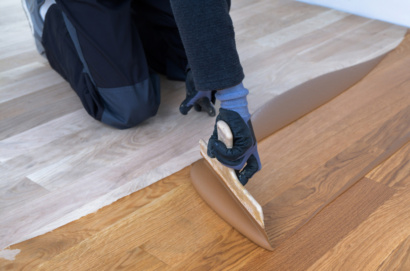
To maintain the antique look, consider hand sanding in areas where the drum sander may be too aggressive. - Stain or Finish:
If you wish to change the color of your antique floors, apply a compatible wood stain. Choose a stain that enhances the wood’s natural beauty while preserving its historical character.
Alternatively, if you’re satisfied with the natural color, proceed to apply the appropriate finish. Consult a flooring professional to determine the best finish for your specific wood type. - Protect Unique Features:
Use masking tape or plastic sheeting to protect any historical features or patterns you want to preserve. - Apply Finish Carefully:
Apply the finish in thin, even coats, following the manufacturer’s instructions.
Allow each coat to dry thoroughly before applying the next.
Sand lightly between coats to achieve a smooth and even finish. - Finish with a Topcoat:
Once you’ve achieved the desired look and protection, apply a topcoat for added durability. - Allow for Curing Time:
Be patient and allow the finish to cure fully before moving furniture back into the room. Curing times can vary depending on the type of finish used.
Maintaining Antique Hardwood Floors
Preserving the charm of your antique hardwood floors doesn’t end with refinishing. To ensure they continue to shine for generations to come, follow these maintenance tips:
- Regular Cleaning:
Sweep or vacuum regularly to remove dirt and debris that can scratch the surface.
Use a damp, not wet, mop for cleaning, and avoid harsh cleaning chemicals. - Protective Measures:
Place felt pads under furniture legs to prevent scratches.
Use rugs or runners in high-traffic areas to reduce wear. - Prompt Spill Cleanup:
Clean up spills immediately to prevent staining and water damage. - Periodic Refinishing:
Keep an eye on the condition of your floors and refinish them as needed to maintain their beauty.
Preserving History, One Floor at a Time
Refinishing antique hardwood floors is a labor of love that requires careful consideration and skilled craftsmanship. The goal is not just to restore the wood’s appearance but to honor its history and preserve its unique character.
When done right, the refinishing process can breathe new life into your antique floors, allowing them to continue telling their story for generations to come. So, whether you have a century-old parquet floor or a farmhouse plank floor, embrace the challenge of refinishing while preserving the charm that makes your vintage floors truly special.
Need a local hardwood floor restoration company in Virginia? FloorU has over three decades of experience refinishing wood floors and restoring them back to life! Contact us today for a free flooring estimate.